一个简单的神经网络数字识别实现(入门级)
本文共 5761 字,大约阅读时间需要 19 分钟。
原文地址:
https://zhuanlan.zhihu.com/p/42174696这里不做过多介绍,只用最快的方式实现简单的图像识别
代码如下:
import numpy as np# scipy.special for the sigmoid function expit()import scipy.special# library for plotting arraysimport matplotlib.pyplot# ensure the plots are inside this notebook, not an external window# helper to load data from PNG image filesimport imageio# neural network class definitionclass neuralNetwork: # initialise the neural network def __init__(self, inputnodes, hiddennodes, outputnodes, learningrate): # set number of nodes in each input, hidden, output layer self.inodes = inputnodes self.hnodes = hiddennodes self.onodes = outputnodes # link weight matrices, wih and who # weights inside the arrays are w_i_j, where link is from node i to node j in the next layer # w11 w21 # w12 w22 etc self.wih = numpy.random.normal(0.0, pow(self.inodes, -0.5), (self.hnodes, self.inodes))#随机取即可,这个是一个经验函数 self.who = numpy.random.normal(0.0, pow(self.hnodes, -0.5), (self.onodes, self.hnodes)) # learning rate self.lr = learningrate # activation function is the sigmoid function self.activation_function = lambda x: scipy.special.expit(x) pass # train the neural network def train(self, inputs_list, targets_list): # convert inputs list to 2d array inputs = numpy.array(inputs_list, ndmin=2).T targets = numpy.array(targets_list, ndmin=2).T # calculate signals into hidden layer hidden_inputs = numpy.dot(self.wih, inputs) # calculate the signals emerging from hidden layer hidden_outputs = self.activation_function(hidden_inputs) # calculate signals into final output layer final_inputs = numpy.dot(self.who, hidden_outputs) # calculate the signals emerging from final output layer final_outputs = self.activation_function(final_inputs) # output layer error is the (target - actual) output_errors = targets - final_outputs # hidden layer error is the output_errors, split by weights, recombined at hidden nodes hidden_errors = numpy.dot(self.who.T, output_errors) # update the weights for the links between the hidden and output layers self.who += self.lr * numpy.dot((output_errors * final_outputs * (1.0 - final_outputs)), numpy.transpose(hidden_outputs)) # update the weights for the links between the input and hidden layers self.wih += self.lr * numpy.dot((hidden_errors * hidden_outputs * (1.0 - hidden_outputs)), numpy.transpose(inputs)) pass # query the neural network def query(self, inputs_list): # convert inputs list to 2d array inputs = numpy.array(inputs_list, ndmin=2).T # calculate signals into hidden layer hidden_inputs = numpy.dot(self.wih, inputs) # calculate the signals emerging from hidden layer hidden_outputs = self.activation_function(hidden_inputs) # calculate signals into final output layer final_inputs = numpy.dot(self.who, hidden_outputs) # calculate the signals emerging from final output layer final_outputs = self.activation_function(final_inputs) return final_outputs# number of input, hidden and output nodesinput_nodes = 784hidden_nodes = 200output_nodes = 10# learning ratelearning_rate = 0.1# create instance of neural networkn = neuralNetwork(input_nodes,hidden_nodes,output_nodes, learning_rate)training_data_file = open(r'C:\Users\dell\Desktop\train.csv')training_data_list = training_data_file.readlines()training_data_file.close()# train the neural network# epochs is the number of times the training data set is used for trainingepochs = 100#设置迭代次数for e in range(epochs): # go through all records in the training data set for record in training_data_list: # split the record by the ',' commas all_values = record.split(',') # scale and shift the inputs inputs = (numpy.asfarray(all_values[1:]) / 255.0 * 0.99) + 0.01 # create the target output values (all 0.01, except the desired label which is 0.99) targets = numpy.zeros(output_nodes) + 0.01 # all_values[0] is the target label for this record targets[int(all_values[0])] = 0.99 n.train(inputs, targets)# load image data from png files into an arrayprint ("loading ... my_own_images/2828_my_own_image.png")img_array = imageio.imread(r'C:\Users\dell\Desktop\6.png', as_gray=True)# reshape from 28x28 to list of 784 values, invert valuesimg_data = 255.0 - img_array.reshape(784)#之所以要进行这一步处理是因为要去除背景,使得测试数据与训练数据的像素矩阵一致。 # then scale data to range from 0.01 to 1.0img_data = (img_data / 255.0 * 0.99) + 0.01print("min = ", numpy.min(img_data))print("max = ", numpy.max(img_data))# plot imagematplotlib.pyplot.imshow(img_data.reshape(28,28), cmap='Greys', interpolation='None')# query the networkoutputs = n.query(img_data)print (outputs)# the index of the highest value corresponds to the labellabel = numpy.argmax(outputs)print("network says ", label)#测试测试集的准确率#f=open(r'C:\Users\Administrator.119V3UR3EO4VMWZ\Desktop\test10.txt')#data=f.readlines()#f.close()##real=[]#for i in data:# real.append(i[0])#y=[]#for i in data:# i=i.split(',')# outputs=n.query(numpy.asfarray(i[1:]))# y.append(numpy.argmax(outputs))#正确率为70% 运行方式,首先将
training_data_file = open(r'C:\Users\dell\Desktop\train.csv')
改为自己存储训练数据的路径,训练数据的获取
通过epochs设置训练数据的迭代次数,img_array = imageio.imread(r'C:\Users\dell\Desktop\6.png', as_gray=True)
将路径改为为测试图片的路径。图片格式要求:28×28.可通过windows自带的画图软件实现设置。
在Jupyter Notebook上运行效果如下: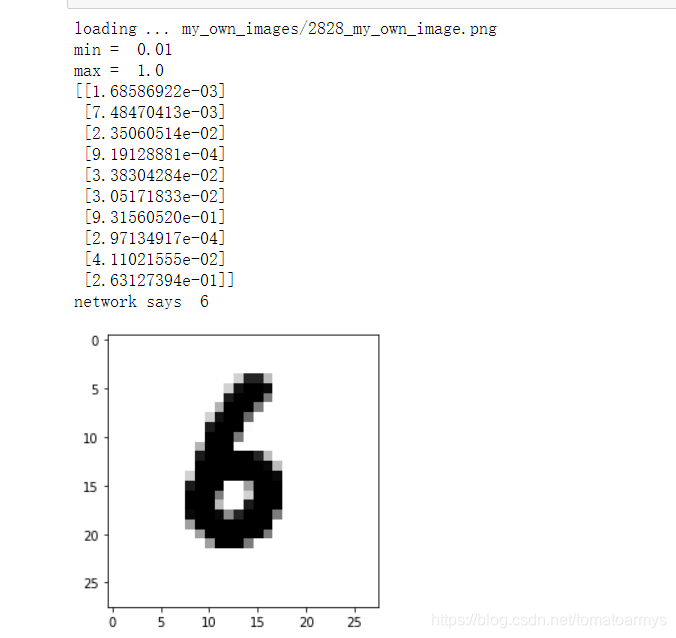 我用的简化版数据。准确率算不上高 VSCode运行效果如下:
 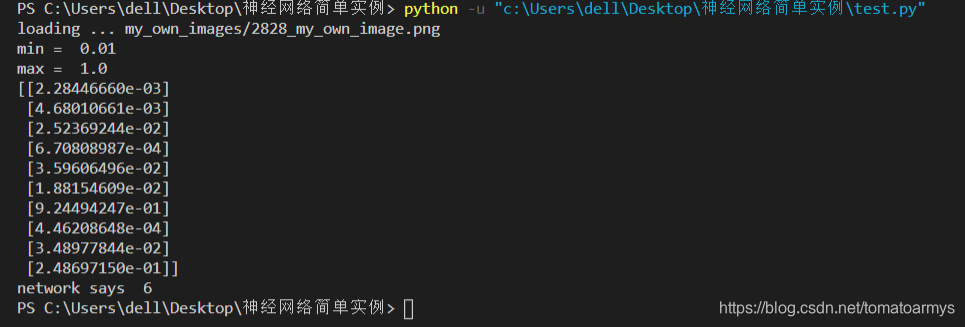 如果想要入门理解的话推荐观看 b站有搬运的,可以自行观看。
 转载地址:http://aazh.baihongyu.com/
你可能感兴趣的文章
mySql分页Iimit优化
查看>>
MySQL分页查询
查看>>
WebDriverException:未知错误:对于旧版本的 Google Chrome,在 Python 中找不到带有 Selenium 的 Chrome 二进制错误
查看>>
mysql列转行函数是什么
查看>>
mysql创建函数报错_mysql在创建存储函数时报错
查看>>
mysql创建数据库和用户 并授权
查看>>
mysql创建数据库指定字符集
查看>>
MySql创建数据表
查看>>
MySQL创建新用户以及ERROR 1396 (HY000)问题解决
查看>>
MySQL创建用户与授权
查看>>
MySQL创建用户报错:ERROR 1396 (HY000): Operation CREATE USER failed for 'slave'@'%'
查看>>
MySQL创建索引时提示“Specified key was too long; max key length is 767 bytes”
查看>>
mysql初始密码错误问题
查看>>
MySQL删除数据几种情况以及是否释放磁盘空间【转】
查看>>
Mysql删除重复数据通用SQL
查看>>
mysql判断某一张表是否存在的sql语句以及方法
查看>>
mysql加入安装策略_一键安装mysql5.7及密码策略修改方法
查看>>
mysql加强(1)~用户权限介绍、分别使用客户端工具和命令来创建用户和分配权限
查看>>
mysql加强(2)~单表查询、mysql查询常用的函数
查看>>
mysql加强(3)~分组(统计)查询
查看>>